
|

The following accounts of the shoot down are from the last American to see the plane and the Japanese historical record. Please view the documents page to view additional information and records.
| 372nd Bombardment Squadron Combat Mission Report: |
 Account By Edward H. Martin, Staff Sergeant, Tail Gunner: Account By Edward H. Martin, Staff Sergeant, Tail Gunner:
 Download Missing Air Crew Report (MACR) #10023 Download Missing Air Crew Report (MACR) #10023
(pdf file 13 MB) Please note the large file size before downloading. Please see an exc
Pat Ranfranz Note: Richard DeBaugh (41st Fighter Squadron, 35th Fighter Group) was a P-47 pilot that we flew cover for B-24s from the 307th on a few missions mission. Please see the following excerpt from an email dated 12/27/04 regarding the "perfect loop" statement above:
. . . So you can see, Pat, that your website has touched my thinking. My fervent wish is that you are able to eventually achieve a degree of closure regarding the Coleman crew. It seems remarkable that you have managed to learn as much as you already have. (Oh, yes, your mention of the Zeke aircraft--it was a Zeke that I downed off the coast of Borneo, a point of recall that is vivid and crystal clear in my own history.) Of interest to me is the more than one account by witnesses of the descriptions of that "perfect loop" made by the Coleman plane in its death maneuver. A perfect loop by a B-24 is questionable, assuming that the plane was more or less in a level flight configuration at the time of its being hit by enemy fire. But, who knows? I was not there and should not judge. Anyway, a perfect loop in a fighter plane is certainly a different matter whereas such a maneuver with a B-34 is, for me, merely conjecture. . .
Please submit additional information.
|
Return to top
| 372nd Bombardment Squadron Combat Mission Report: |
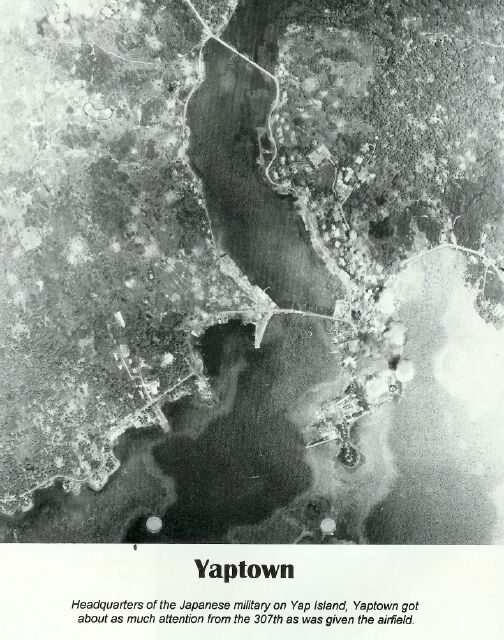
A/C#598, Pilot, Lt. Coleman was attached by a Zeke about one minute and half after bombs away with hits being scored on #2 and #3 engines. The cockpit and bombardier's compartment were seen with flames coming out the windows which had been shot out. The plane made a perfect loop, then feel off to the right in a spin and crashed in the water 2 miles South of the runway. It was strafed al the way down and also after hitting the water. No parachutues were seen and it is believed that all members of the crew are dead.
Pat Ranfranz Note: The crsh site is listed as 2 miles south of the Yap runway within the Missing Report. This is different then 3-5 miles south from the Missing Air Crew Report. The other reports seem to indicate that the plane went down near the island and not 3-5 miles south (5th BG report, Sub Report, etc.)
Please submit additional information.
|
Return to top
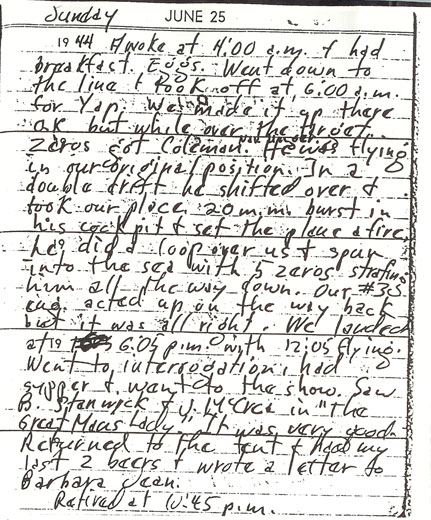
| Excerpt from other crew diary's: |
Excerpt from the diary of Len Lystad (Jarried Crew 372nd)
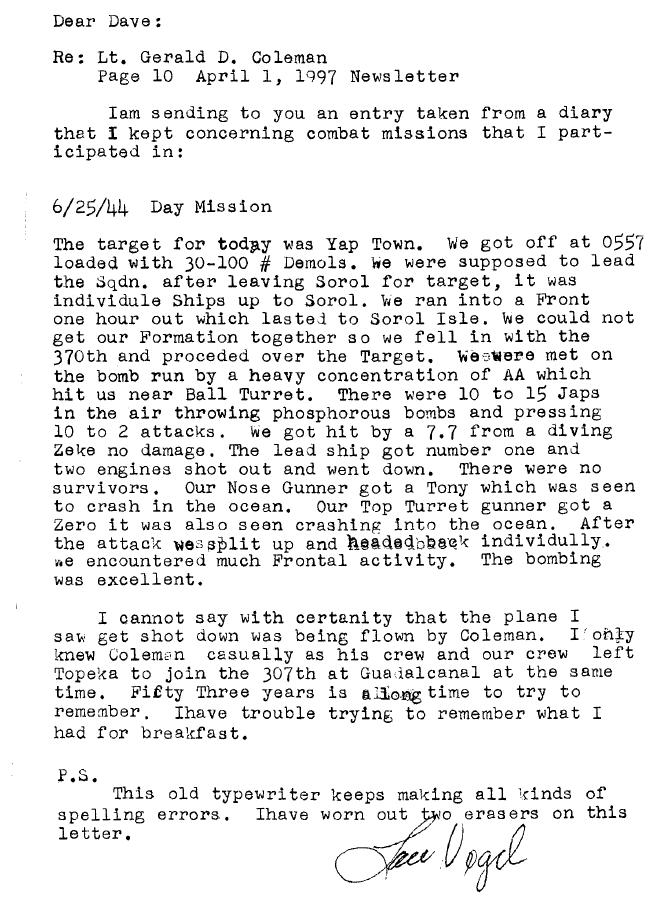
Letter from Lew Vogel:
Please submit additional information.
|
Return to top
| Excerpt from the 5th Bombardment Group Combat Mission Report: |
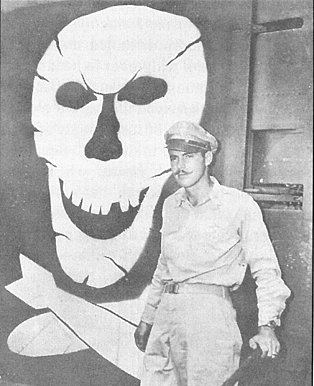
Art Rogers and the famous Skull and Cross
Bombs of the "Jolly Roger" 90th Bomb Group
|
One plane of 307th Gp was seen to crash at 9º25'30"N - 138º05'E at 1152 K. No survivors were seen and no fire, smoke or explosion from the plane. This plane was reported to have gone down in a flat spin and crashed just outside the reef south of the island. Two enemy fighters followed this airplane down but were not strafing. No parachutes were seen.
5th Bomb Group Consolidated Mission Report No. 5-336 for 25 June 1944
(pdf file 1.3 MB)
Pat Ranfranz Note: How can the 5th Bomb Group mission report (for the same mission) be so different from the 307th Bomb Group mission report regarding the shoot down of the Coleman crew? The 5th Bomb Group reports NO strafing, no fire, etc. The 307th Bomb Group reports a fire and that the plane was strafed all the wat down and while on top of the surface.
Please submit additional information.
|
Return to top
| USS ALBACORE (SS 218)--Captain of the ALBACORE spent 4 days looking for Coleman's B-24 crew: |
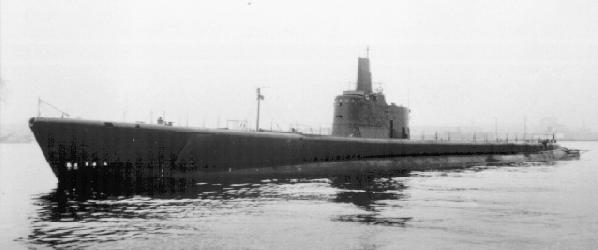
USS ALBACORE (SS 218). Lost on
November 7, 1944 - 85 Men Lost. View more info about the USS ALBACORE.
|
Excerpts from the ALBACORE War Patrol Report 9:
The following information was located and sent to me by Mark Swank. Mark searched the US Sub War Patrol Reports and located some of the most interesting information I have ever received regarding the Coleman crew. The war patrol report from the U.S.S ALBACORE shows that the Captain of the ALBACORE spend 4 days looking for Coleman's B-24 crew in between supporting numerous LIBERATOR bombings of YAP. I now have to take back numerous statements I have made over the years that the military never searched for the Coleman crew. In fact, the ALBACORE spent numerous days searching for the crew. I have listed some excerpts below regarding the ALBACORE's patrol record as it relates to the Coleman crew. In addition, the complete report can be downloaded in a PDF file format. Tragically, the ALBACORE was lost on 7 November 1944 with 85 men.
PAT NOTE: Unfortunately for the Coleman crew, the USS ALBACORE received information about two planes going down. They decided to go look for the first plane, however, it's likely there was no first plane. Had the sub stayed on station and proceeded directly to the Coleman crash site the chances of recovery would have been significantly higher!
The USS ALBACORE received word on voice circuit at 1120 that plane was coming down 95 miles away near Soral Island. The sub changed course and headed away from Yap to locate the downed plane. At 1135, they received word that a plane was down 2 miles off TONIL HARBOR entrance (Coleman crew) but the sub continued to the position of first plane reported as chances of rescue were thought to be better. At 1850 they received word once again that a plane was down one mile south of YAP. They asked if there was a plane down in area they were searching but received no answer therefore, they discontinued the search and set course for south end of YAP. The sub arrived at the Coleman crash site on 26 June at 0430 and started searching the area.
23 June: Enroute YAP area for lifeguard duties.
24 June:
- 1410, YAP in sight bearing 309 degrees (T) distant 23 miles.
- 1640, Surfaced. Patrolling south end west of YAP.
- 2200, Headed east to be on station tomorrow's raid
by Army.
25 June:
- 0845, Changed course to close YAP and be in position for
strike 1030.
- 1016, SD contact 27 miles (Aircraft Contact #35). This
contact on the SD screen at ranges varying from
30 to 17 miles until.
-
1037, When flight of 21 LIBERATORS sighted headed for YAP:
Went ahead full on all engines, closing YAP.
-
1101, Observed large fires on YAP.
- 1120, Received word on voice circuit that plane was coming
Down 95 miles bearing 290 degrees (T) from SOROL. This
message distinctly heard by Communications Officer.
-
1123, Changed course to 153 degrees (T) to head for downed plane,
and increased speed to maximum.
- 1135, Received work on 8455 CW that plane was down. This
position plotted in 2 miles off TONIL HARBOR entrance.
Continued to position of first plane reported as
chances of rescue were thought to be better.
- 1418, Arrived at reported position of downed plane and
commenced search.
- 1850, Received word on 8455 CW that plane was down one
mile south of YAP.
- 1915, On 8455 CW asked if there was a plane down in area
we were searching. No answer received.
-
2207 Discontinued search and set course for south end of YAP.
26 June: Enroute new search area.
-
0430, Two miles south of YAP, searching area
- 0530, SD contact 8 miles (Aircraft Contract #36). Dove.
Conducted search submerged along southwest coast
of YAP.
- 0630, Sighted BETTY thru periscope (Aircraft Contact #38).
This plane or similar one's searched in our vicinity
until 1015.
- 1108, Heard explosions and shortly thereafter sighted fires
on YAP.
- 1205, In view of the fact we had been submerged during day's
strike called the Army Bombing Bras and asked if they
had any area for us to search. No answer received.
- 1525, Set course to head for and search area southwest
of YAP.
- 1930, Commenced search of area.
27 June: Searching area.
- 0559, Surfaced and set course for position for day's strike.
- 1025, Sighted formation of 5 LIBERATORS bearing 150 degrees (T)
range 15 miles (Aircraft Contact #46.
- 1044, Sighted flight of LIBERATORS thru periscope, range
15 miles. (Aircraft Contact #47).
- 1046, Surfaced. Making full speed, closing YAP.
- 1047-1100, Observed air battle between 19 LIBERATORS and
Jap fighters.
- 1113, LIBERATORS disappeared heading southward.
- 1204, Asked Army Flight Commander if he had area for us to search. No answer received.
-
1403, Set course for area southwest of YAP to continue
search for plane lost on the 25ht of June.
- 2000 Commenced search of area.
28 June: Searching area. Several times during Mid-watch sighted lights on YAP airfield.
- 1032, Sighted the first of 40 LIBERATORS headed for YAP
(Aircraft Contact #56).
- 1049-1107, Observed bombing of YAP (Huge fires on YAP TOWN, and
at airfield), moderate anti-aircraft fire over YAP,
and air battle between LIBERATORS and Jap fighters.
Fighters broke off engagement. Counted 40 LIBERATORS
heading south.
- 1330, Set course for area southwest of YAP to continue
search for plane downed on the 25th.
- 1900, Commenced search of area.
29 June: Searching area.
- 0513, Set course for position for day's strike.
- 1024, In position. First of many SD contacts 12 to 35
miles. (Aircraft Contact #58). Began closing YAP.
Observed bombing of YAP, anti-aircraft fire, and air
battle between Army bombers and Jap fighters.
Numerous contacts on SD.
- 1058, SD contact 4 miles, closing (Aircraft Contact #59).
Dove. Surfaced by ZEKE as diving alarm was sounded
and again just before bridge went under. Several
holes in deck and end superstructure, hits on the bridge
and on 20MM hole in breech cover of 4" gun. No
casualties to personnel.
Download ALBACORE War Patrol Report 9:
ALBACORE War Patrol Report 9.pdf (Covers June 23-29, 1944)
(pdf file 1.3 MB)
ALBACORE War Patrol Report 9.pdf (Covers 29 May 1944 to 16 July 1944)
(pdf file 15 MB)
USS ALBACORE Muster Roll of the Crew 30 June 1944
(pdf file 4.9 MB)
Thank you Mark Swank!
Commanding Officer, U.S.S. Albacore Citation
From http://www.homeofheroes.com/verify/1_Citations/nc_06wwii_navy.html
BLANCHARD, JAMES W.
Commander, U.S. Navy
Commanding Officer, U.S.S. Albacore
Date of Action: May 29 - July 16, 1944
Citation:
The Navy Cross is presented to James W. Blanchard, Commander, U.S. Navy, for meritorious conduct in action in the line of his profession as Commanding Officer of the U.S.S. Albacore during that vessel's Ninth War Patrol from 29 May 1944, to 16 July 1944. Rear Admiral (then Commander) Blanchard skillfully and aggressive penetration of enemy escort screens maintained around a large enemy task force enabled him to launch a torpedo attack which resulted in the damaging of a large Skokaku class aircraft carrier of 29,800 tons. In an excellent and daring surface gun attack he destroyed a 1,000 ton inter-island enemy steamer, and shelled and damaged the phosphate works on Fais Island. His skillful evasive tactics during enemy counter-measures, and strafing and bombing by enemy planes, enabled him to escape and bring his ship to port without damage. His conduct throughout was an inspiration to his officers and men, and is in keeping with the highest traditions of the Naval Service.
CinC Pac Letter P15/BA, Serial 05480 (October 9, 1944)
Pat Ranfranz Note: I can't thank Mark Swank enough for taking time to locate the reports. His time and dedication to helping myself and others is greatly appreciated.
Mark Swank lives in the Washington, D.C. area and is currently employed with Northrop Grumman IT as a Senior IT Database Consultant at the Defense Intelligence Agency. He currently supports both the MissingAirCrew (www.missingaircrew.com) and BentProp (www.bentprop.org) Projects to research, locate and repatriate MIAs from World War II through his research at the National Archives and Records Administration (NARA).
Please submit additional information.
|
Return to top
| Japanese Report: |
 Time zone is (I) or (-9)
Names are all written in the Oriental way.
Q1)25JUN: 1 B24 shot over by fighters over water near Yap but witnesses said no survivors
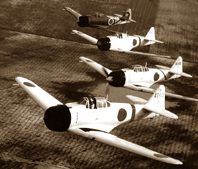
A1) Earlier this morning, nine Zekes and one Judy (guiding these Zekes to Yap ) flew from Peleliu to Yap and 8 Zekes and 1 Judy returned Palau after the contact. (No unit number or pilots' names are available)
1000 An airraid alert was issued.
1045(-9) 22 B24s (in two groups) attacked Yap.
Total of 17 Zekes interecepted these Liberators. Four out of the seventeen were with 202 Ku (Sento 301)(PO1c HAYASHI, Josaku, PO1c OHKUBO, Kotozo, CPO TANAKA, Toshio, Ldg Sea (aviation) KIKI?, Motohiro) The 202 Ku took off at 1040 and returned at 1130. They claimed 1 KILL, 2 damaged against the enemy, no damage to the four Zekes. No further information for the rest of the Zekes. 1100 The alert ended. Damage in Yap: 2/3 of runway was damaged by the bombardment. Two KIAs on the ground (Ldg Sea ISHIBASHI,Yasuhusa, Sea 1c MORI, Shiro)
Source: Pat Scannon [SCANNON@xoma.com]
Rick Dunn Update:
In addition to 202 Ku, many units touched Yap during the build up to, and operations over, the Marianas. Twelve Zeros of 343 Ku moved to Yap on 6/17 and stayed til end of the month. The main force of 265 Ku arrived Yap after 6/17 (Jap. Monograph 116 does not agree with this; places them in the Marianas thru this period -- my note: probably only remnants). "Part" of 261 Ku arrived Yap mid-June (my note: probably only remnants).
Source: Rick Dunn using secondary sources including: Hata&Izawa, Japanese Navy Fighter Units and Aces.
Research by Yukitoshi from Japan
25 June 1944...
The 265 Ku made nine "ZEKE"s sortie and the 201 Ku two "ZEKE"s were opened by the battle in the hole on that day.
25 June. 24 B-24s attacked at 12:00. One B-24 was shot down. Four B-24 took out white smoke." "Two ZEKEs was holed. (201 Ku).
Please submit additional information.
|
Return to top
| Excerpt from "The Long Rangers-A Diary of The 307th Bombardment Group(H) by Sam S. Britt, Jr.: |
|
Pat Ranfranz Note: This is the only account of life rafts in the water and a "bloody, foaming spot in the water". Did Mr. Britt add to the accounts of the crash for his book or is this information from another source?
12/13/2004—Update: I found the anwser to my life raft question in the book titled, "Devil at My Heels: A WW II Hero's Epic Saga of Torment, Survival, and Forgiveness
" by Louis Zamperini. "All B-24s pack two life rafts in fuselage compartments above the wings, mounted against spring-loaded plates. The outside covers latch with a pin, with a weight on the end. When the plane hits water, the impact dislodges the pin, the doors burst open, and the spring plate throws the rafts out about a hundred fet, over each wing, into the ocean. That pulls a trigger mechanism and the rafts inflate while still attached to the plane by parachute cord. When the plane sinks below a certain depth, the cords pull free of the plane. "
Phil Marchese from WWW. B24BESTWEB.com replied with the following info:
Two life raft compartments with release handles were above the bomb bay, at the wing center section. These had external doors which could have released during the impact with the water or opened by other damage incurred in the shoot down.
 Lt. Gerald D. Coleman's(372nd) plane received direct hits in #2 and #3 engines from 20mm fire. The cockpit and bombardier's compartment caught fire ad flames could be seen coming out of the windows. The plane performed a perfect loop, fell off to the right in a spin and crashed in the water. It was strafed all the way down by the enemy pilots. No parachutes were seen. The enemy pilots zigzagged back and forth over the wrekage and life rafts until nothing remainewd except a bloody, foaming spot in the water.
Download Except from "The Long Rangers-A Diary of The 307th Bombardment Group(H) by Sam S. Britt, Jr.
(pdf file 1,551 KB)
Please submit additional information.
|
Return to top
| Excerpt from the 372nd Bombardment Squadron Historical Data Report-Dated 5 July 1944: |
|
On 25 June, Lt BALDWIN led a six ship formation to the Yap Dispersal area with 160 120 pound fragmentation bombs comprising the bomb load. The bombs were dropped from 11,000 feet and formed an oval pattern 1,000 feet west of the southeast end of the runway. The pattern was 1600 feet wide and 1800 feet long. One enemy airplane was completely demolished by a near-miss. Fifteen to twenty enemy fighters came up to intercept the formation. These ships were all identified as Zekes with the exception of one which was believed to be a Tony. 2nd Lt GERALD D COLEMAN’s airplane received direct 20mm hits in the No. 2 and 3 engines. The cockpit and Bombardier’s compartment were set afire and the ship performed a perfect loop and fell off to the right in a spin and crashed in the water. The ship was strafed all the way down and no parachutes were seen. 1st Lt CARL F MARTIN’s ship was hit by 20mm fire in the wing outboard of the No. 4 engine and in the right main landing gear tire. 2nd Lt FRANK ROGER’s airplane was hit eight times by 7.7 fire in the empennage.
The fighter interception began just after “Bombs Away” and continued for twenty to twenty-five minutes. Attacks were made from all around the clock and was the best co-ordination of attack and feints that the enemy has exhibited against this Squadron. The attacks were made by two, three or four fighters scissoring from widely separated points. Two were shot down and two were damaged. The first Zeke attacked from nine o’clock low and was fired upon by T/Sgt CHARLES H MCMULLEN, left-waist gunner and S/Sgt DONALD T JEPSEN, ball gunner of Airplane No. 567. The fighter was seen to catch fire at the wing roots and crash in the water. S/Sgt MELVIN B MILLER, ball gunner of the lead ship, caught the second Zeke at eleven o’clock low and the fighter broke off to the left and exploded at 200 yards. Two other Zekes were damaged by fire from our gunners. The antiaircraft fire was heavy but inaccurate as to course and altitude.
Download Historical Data-372nd Bombardment Squadrom (H)
(pdf file 9,055 KB)
Please submit additional information.
|
Return to top
Return to top
| Jim Kendall, Historian, 307th Bomb Group Association: |
|
The following is an excerpt from a letter Jim Kendall sent Patrick Ranfranz dated 22 December 2004:
I do remember watching Zero fighters strafing the Coleman crash site. We were propably flying at about 12,000 feet and at least two Zeros were down at sea-level working over the crash site to get any possible survivors. It was totally unnecessary. That was the most frustrating thing about flying combat—if anyone was shot down we could do nothing but fly on.
Jim Kendall, Historian
307th Bomb Group Association
Please submit additional information.
|
Return to top
| Excerpt and pictures from Frank Klein email: |
|
The following pictures were supplied by Frank Klein. Mr. Klein flew 49 missions with the 372nd Bomb Squadron, however, he was on a training mission on 6/25/44 when the Colemand plane was shot down. Frank stated in a 12/18/04 email to Paul Jurica (Nephew of Co-Pilot John E., Jr. Jurica), "We were a newer crew and although I probably met your uncle I do not remember him or his crew. We bombed YAP a week later. Over a period of weeks we lost several
crews over YAP. You can rest assured every effort was made to rescue any survivors. Our
submarines and PBY flying boats were off shore on every mission to help pick up survivors.
Click to enlarge the thumbnail images below:

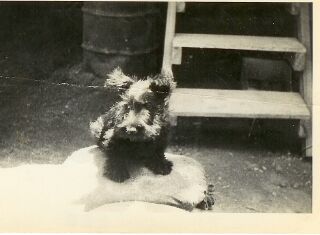
A Scotty Dog was the 372nd Squadron's Mascot. The picture is a close up of the dog sitting on a sand bag by the bomb shelter on Los Negros.
|

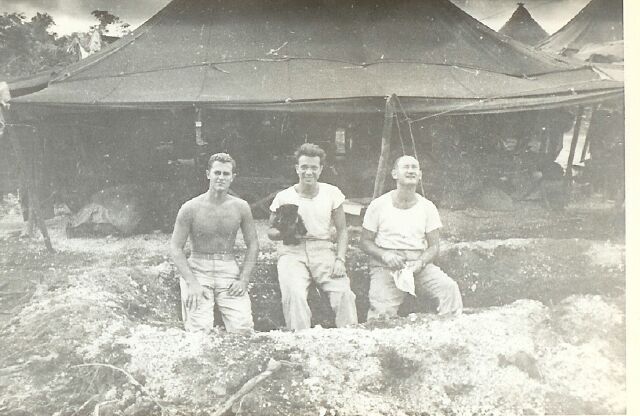
Frank Klein (middle) is holding the dog. Frank and crew are sitting in a bomb shelter outside their tent. They were bombed about
every night.
|

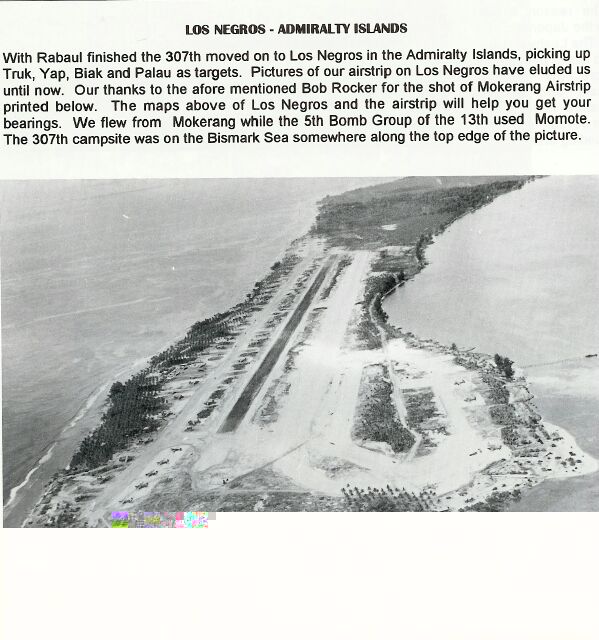
Picture of the
Los Negros - Admiralty Island airbase the 307th flew out of to bomb YAP
|

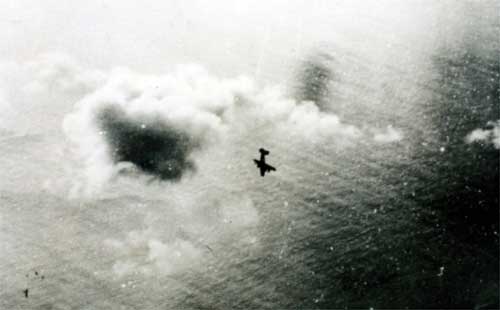
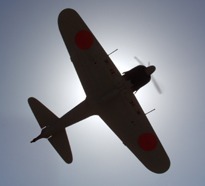
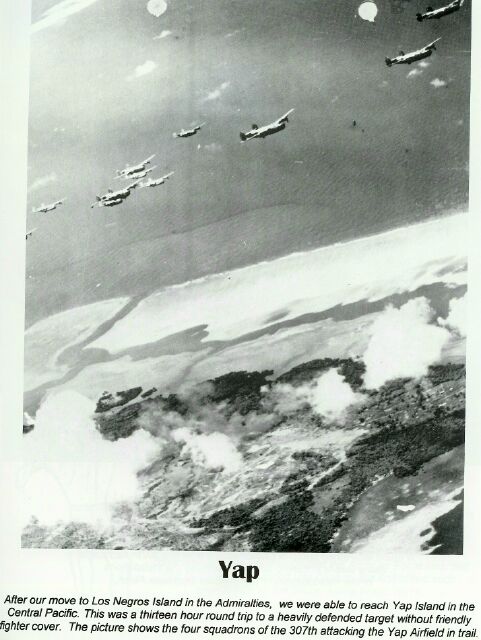
Photos taken on bombing missions to YAP.
|

Photos taken on bombing missions to YAP.
|
Please submit additional information.
|
Return to top
Return to top
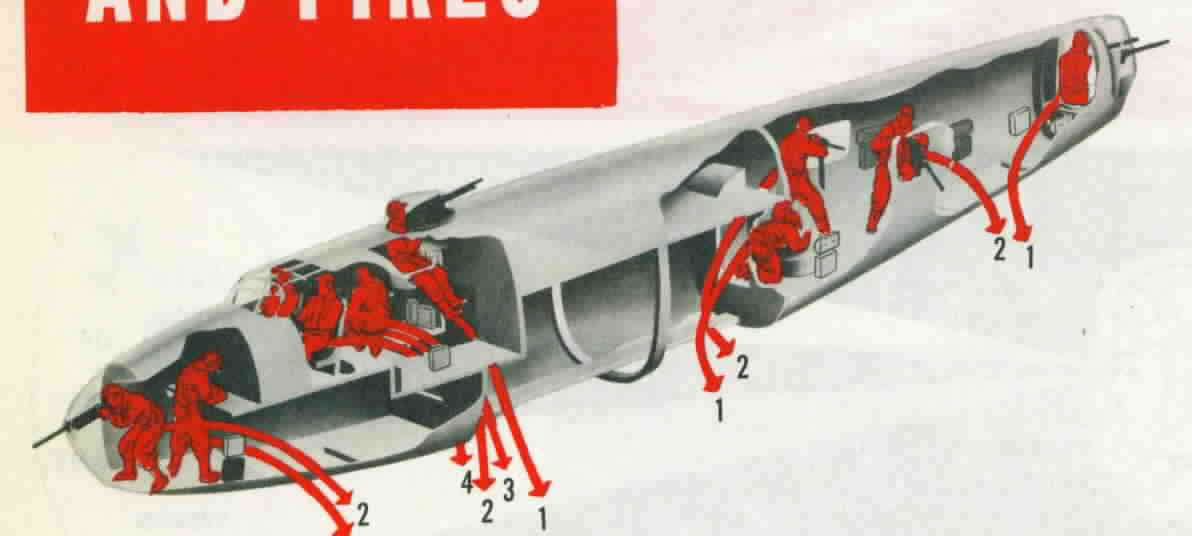
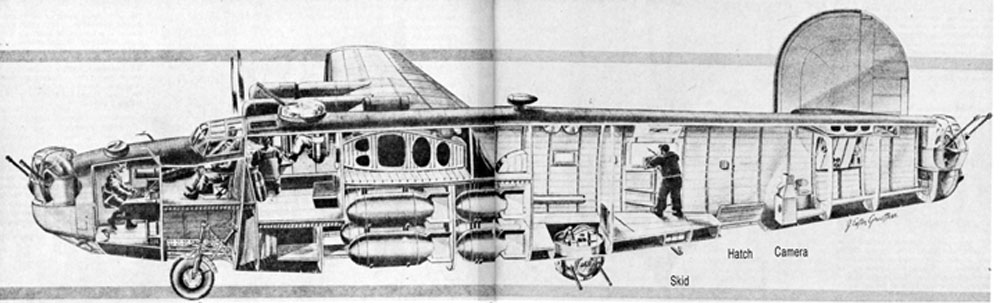
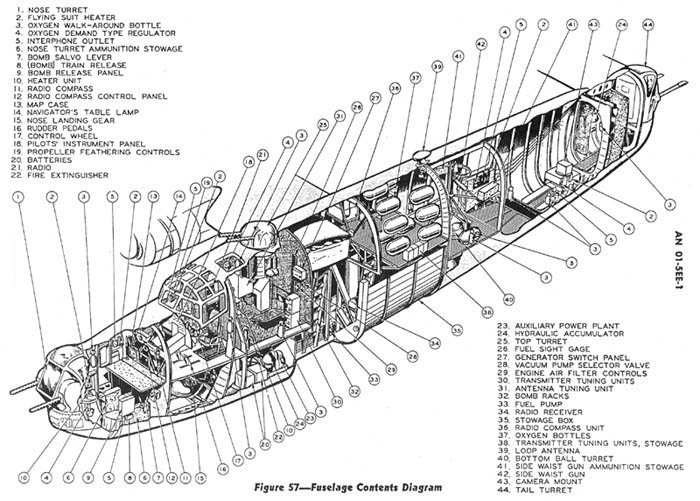
| Diagram showing B-24 Emergency Equipment and Escape Exits: |
|
The folowing excerpt from the book, "Devil at My Heels: A WW II Hero's Epic Saga of Torment, Survival, and Forgiveness " by Louis Zamperini explains how the lift rafts would have come out of the plane when it hit the water: "All B-24s pack two life rafts in fuselage compartments above the wings, mounted against spring-loaded plates. The outside covers latch with a pin, with a weight on the end. When the plane hits water, the impact dislodges the pin, the doors burst open, and the spring plate throws the rafts out about a hundred fet, over each wing, into the ocean. That pulls a trigger mechanism and the rafts inflate while still attached to the plane by parachute cord. When the plane sinks below a certain depth, the cords pull free of the plane."
Click to enlarge the following images showing B-24 emergency equipment and escape exits:
Please submit additional information.
|
Return to top
Submit comments about this site
Web Site Terms of Use: This web site authorizes you to view materials solely for your personal, non-commercial use. You may not sell or modify the material or reproduce, display, distribute, or otherwise use the material in any way for any public or commercial purpose without the written permission of the web site owner. pat@missingaircrew.com
|

|


 PIN IT